
Project Definition
The goal of the project is to program a youBot to put away groceries. You have control of one youBot that can move around a virtual house. Groceries are waiting in the hall. You need to provide the youBot with a program that allows it to move the groceries to their appropriate storing locations.

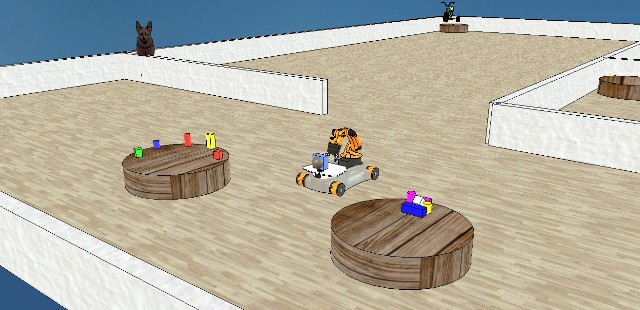
Object are either cylindrical or box-shaped. The bases of boxes and cylinders are fixed, only their height varies. The base of box-like objects is 50mm by 50mm. The diameter of the base of cylinders is 50mm. The color of objects varies. Objects are initially placed on two tables facing the youBot's starting position. (The two tables are visible with the Hokuyo sensor from the youBot's starting position. No other cylindrical objects are within sight of the Hokuyo from the youBot's starting position.) On one table, objects are placed upright. On the other table, objects are not necessarily placed upright – they may be laid down or tilted.
The size of the house is fixed (see house.ttt). However, the youBot does not know the layout of the house a priori. All obstacles are high enough to be detectable with the Hokuyo sensor. There are no holes or open doors leading outside the house. There are five baskets around the house, whose location is not fixed, although they are always close to room/hallway corners. Baskets and tables are cylinders, 800mm in diameter, and 185mm in height. The tables and baskets are the only cylindrical objects resting on the floor. Next to each basket is a landmark object (of approximately the same size as the youBot), that allows the youBot to identify the room in which it is located. For instance, one basket could be placed next to a bike (garage), or next to a computer (office). The youBot has access to a list of instructions consisting of pairs of object descriptors (green box, blue cylinder…) and images. Instructions are accessed via load instructions.mat inst. This structure follows the following schema:
inst(1).shape: shape of the first object (eitherboxorcylinder).inst(1).color: color of the first object (R, G, B values).inst(1).picture: path to an image of the landmark next to which is located the basket in which object 1 must go.inst(2).shape: shape of the second object (eitherboxorcylinder).inst(2).color: color of the second object (R, G, B values).inst(2).picture: path to an image of the landmark next to which is located the basket in which object 2 must go.- …
The goal of the project is to move each object to the appropriate basket. At most one object can be stored on the platform of the youBot. The image below illustrates the layout explained above. A V-REP file similar to the one on which projects will be tested is available in the Git repository (see directory youbot).
Milestones
- Navigation
Building a map of the house (a map of the walls and other obstacles).- Using accurate localization (via
simxGetObjectPositiononyouBot_reforyouBot_center) - Without using
simxGetObjectPositiononyouBot_reforyouBot_center.
- Using accurate localization (via
- Manipulation
Picking up objects and moving them to any room of the house (except the room where the objects start in), not necessarily in a basket.- Moving only the objects from the first table (where objects stand upright), using V-REP IK. Objects can fall on the floor.
- Moving all the objects (both tables), using V-REP IK. Objects can fall on the floor.
- Moving all the objects (both tables), using V-REP IK. Objects cannot fall on the floor.
- Moving all the objects (both tables), without using V-REP IK. Objects cannot fall on the floor.
- Vision
Finding and identifying the baskets.- Finding the baskets and the tables.
- Recognizing the landmark objects accompanying the baskets, based on the data from
instructions.mat.
- Manipulation and Vision
- Placing the objects into arbitrary baskets (as long as there is the same number of objects in each basket). (Requires at least B.1 and C.1.)
- Placing the objects into the appropriate basket, as indicated by
instructions.mat. (Requires at least B.1 and C.2.)
- Calibration
Computing the transformation between the frame of the vision sensor, and the frame of the robot. (WithoutsimxGetObjectOrientationonrgbdSensor.) - Bonus Milestone: create a video of your work!
Ideally including a view from the simulator, and of the robot process (for instance, the map being constructed). In V-REP, the menu Tools has a Video Recorder option that allows you to save the simulator's image stream to disk.
For you to claim a milestone, your robot must be able to perform the corresponding task without prior knowledge of the room in which it is placed (except for the hypotheses mentioned on this page).
Programming the youBot
First, follow the setup procedure to get your laptop ready.
Most of the youBot functionalities can be understood by browsing through the youBot example script, which shows how to access to the sensors and actuators of the youBot.
The example script is located in the directory youbot of the course's Git repository. To run the example:
- Open the file
house.tttin V-REP. - In MATLAB, go to (
cd) to theyoubotdirectory, and start theyoubotscript. It automatically starts the simulation; if it did not work, hit the start simulation button .
.
The sections below provide more details about the youBot's sensors, actuators, and gripper.
Names of V-REP Components
The V-REP names of the youBot's components are listed below. You can get a programmatic handle to these components via the simxGetObjectHandle method. It is automatically done when you use the youbot_init script: the fields of the returned structure have slightly different names, they are given between parentheses.
youBot_ref(armRef): a point on the rotation axis of the first arm joint.youBot_center(ref): the center of the youBot's frame.rollingJoint_fl(wheelJoints(1)),rollingJoint_rl(wheelJoints(2)),rollingJoint_rr(wheelJoints(3)),rollingJoint_fr(wheelJoints(4)): the four wheel joints.rgbdSensor(rgbdCasing): the box containing the depth and photometric cameras.xyzSensor (,xyzSensor)rgbSensor(rgbSensor),fastHokuyo_sensor1(hokuyo1),fastHokuyo_sensor2(hokuyo2): the depth and photometric cameras, and the two 120–degree Hokuyo sensors. >
Rectangle22(r22): the rectangle at the bottom of the arm.
Signals for Controlling the youBot's Sensors and Gripper
The youBot's sensors can be turned on or off through following V-REP signals: handle_xyz_sensor, handle_xy_sensor and handle_rgb_sensor. (See for instance simxSetIntegerSignal.) The value of handle_xyz_sensor controls the depth camera:
handle_xyz_sensorset to 0 (or undefined): the depth camera is off.handle_xyz_sensorset to 1: the depth camera is turned on, takes one shot, and is automatically turned off again.handle_xyz_sensorset to 2: the depth camera is turned on, and stays on until the value of the signal is changed again.
The RGB camera is controlled in the same way with handle_rgb_sensor. The signal handle_xy_sensor controls both fastHokuyo_sensor1 and fastHokuyo_sensor2.
The three signals handle_xyz_sensor, handle_xy_sensor and handle_rgb_sensor only control whether V-REP is computing what the sensors see. Setting one of these signals to 1 or 2 will not make V-REP send the data over to MATLAB. Whether and how the data is sent to MATLAB is controlled via simxReadVisionSensor or simxGetVisionSensorImage2 and remote operation modes (such as streaming, oneshot, etc.).
It generally presents no problem to leave the Hokuyo sensor continuously on, and to get its data with the streaming operation mode (see the example script). However, the RGB and depth cameras however are expensive to run. They slow down V-REP, and clog the network. It is advised to turn the two cameras on only when needed, by setting their signal to 1, and recovering the generated image or point cloud with the oneshot or oneshot_wait operation mode (see the main example script and the focused examples for the RGB and depth cameras).
The view angle of the depth camera and the RGB camera can be controlled via a signal named rgbd_sensor_scan_angle:
res = vrep.simxSetFloatSignal(id, 'rgbd_sensor_scan_angle', pi/8, vrep.simx_opmode_oneshot_wait); check(vrep, res);
The default angle is pi/4.
The gripper_open signal controls the gripper:
gripper_openset to 1 or unset: the gripper opens.gripper_openset to 0: the gripper closes and applies a constant force inwards (it is not possible to control it).
The km_mode signal turns the robot's inverse kinematics mode on or off:
km_modeset to 0 or unset: the arm joints are in position-control mode. Use simxSetJointTargetPosition to change the arm's configuration.km_modeset to 1: activates a controller that attempts to move the tip of the gripper to the position ofyouBot_gripperPositionTarget. Use simxSetObjectPosition onyouBot_gripperPositionTargetto move the tip of the arm to a position in the youBot's frame.km_modeset to 2: activates a controller that attempts to move the tip of the gripper to the position ofyouBot_gripperPositionTarget, and to partially align the gripper to the orientation ofyouBot_gripperPositionTarget. Since the youBot's arm has only five DOFs, it cannot reach any arbitrary orientation. This controller only changes the orientation of the gripper around the axis of the second/third/fourth joint. Use simxSetObjectPosition onyouBot_gripperPositionTargetto move the tip of the arm to a position in the youBot's frame, and simxSetObjectOrientation onyouBot_gripperOrientationTargetto partially orient the tip of the arm to an angle in the frame of the first link of the arm. See example below for details.
The displaylasers signal turns the V-REP laser display on or off. When displaylasers is set (whatever its value), V-REP displays red rays along the scanning lines of the Hokuyo, or red dots at the scanning points of the depth sensor. The only purpose served by this signal is illustration, and displaying the lasers slows V-REP down. You will generally want to keep this function off.
Documentation And Useful Links
The Robotics Toolbox's documentation is available here.
The documentation of the V-REP simulator is available here (also available via the Help menu in V-REP). Within the doc, the two most important pages are:
- The Simulation and Simulation settings dialog, that explain how the simulator works.
- The Remote API, that allows you to speak to V-REP through the network:
- Enabling the Remote API - server side: Read if you want to enable the continuous service, for instance to allow MATLAB to start/stop the simulation. Do not enable the syncSimTrigger option, as you will not be allowed to do so during the project evaluation.
- Remote API modus operandi: Explains the network-related client-server issues.
- Remote API constants
- Remote API functions (C/C++)
- Remote API functions (Python)
- Remote API functions (MATLAB)
Other useful tools:
- MeshLab is an open-source graphical app for manipulating meshes. For instance, you can use it to inspect shapes from the V-REP environment. In V-REP, click on a shape and use the Export as OBJ menu to write the shape to a file. In MeshLab, you can for instance use the ruler tool
 to measure the length of the object.
V-REP Remote API: Authorized Calls
In your project, you will be allowed to use only a subset of the V-REP API. Off-limits functions are, for instance, functions that change the environment (adding/removing/moving objects), functions that access information that would not be available to the robot in a real setup, or functions that move the robot in an unrealistic way.
The list below shows the functions that are authorized, some with restrictions. I built this list conservatively. It will probably grow in the coming weeks. I'm open to your suggestions.
Click here to show/hide unauthorized functions. Note that, by default, functions not shown in the list are off-limits.
- simxAddStatusbarMessage
- simxAppendStringSignal
- simxAuxiliaryConsoleClose
- simxAuxiliaryConsoleOpen
- simxAuxiliaryConsolePrint
- simxAuxiliaryConsoleShow
- simxBreakForceSensor
- simxClearFloatSignal
- simxClearIntegerSignal
Only on the following signals:
displaylasers,handle_xyz_sensor,handle_xy_sensor,handle_rgb_sensor,gripper_open,km_mode. - simxClearStringSignal
- simxCloseScene
- simxCopyPasteObjects
- simxCreateBuffer
- simxCreateDummy
- simxDisplayDialog
- simxEndDialog
- simxEraseFile
- simxFinish
- simxGetAndClearStringSignal
- simxGetArrayParameter
- simxGetBooleanParameter
- simxGetCollisionHandle
- simxGetConnectionId
- simxGetDialogInput
- simxGetDialogResult
- simxGetDistanceHandle
- simxGetFloatingParameter
- simxGetFloatSignal
Only with the following signal:
rgbd_sensor_scan_angle. - simxGetInMessageInfo
- simxGetIntegerParameter
- simxGetIntegerSignal
Only on the following signals:
displaylasers,handle_xyz_sensor,handle_xy_sensor,handle_rgb_sensor,gripper_open,km_mode. - simxGetJointMatrix
Only on the robot's joints.
- simxGetJointPosition
Only on the robot's joints.
- simxGetLastCmdTime
- simxGetLastErrors
- simxGetModelProperty
- simxGetObjectChild
- simxGetObjectFloatParameter
- simxGetObjectGroupData
- simxGetObjectHandle
Only for objects that are part of the robot.
- simxGetObjectIntParameter
- simxGetObjectOrientation
Only with the following handle arguments, as in the simulator (the values between parentheses indicate the corresponding field of the structure returned by
youbot_init):objectHandle relativeToObjectHandle Milestone rgbdSensor ( rgbdCasing)youBot_ref ( armRef), youBot_center (ref)all except E xyzSensor ( xyzSensor)rgbdSensor ( rgbdCasing)(any) rgbSensor ( rgbSensor)rgbdSensor ( rgbdCasing)(any) fastHokuyo_sensor1 ( hokuyo1)youBot_ref ( armRef), youBot_center (ref)(any) fastHokuyo_sensor2 ( hokuyo2)youBot_ref ( armRef), youBot_center (ref)(any) youBot_ref ( armRef), youBot_center (ref)-1 all except A.2 youBot_gripperPositionTip ( ptip)youBot_ref ( armRef)all except B.4 youBot_gripperPositionTarget ( ptarget)youBot_ref ( armRef)all except B.4 youBot_gripperOrientationTip ( otip)Rectangle22 ( r22)all except B.4 youBot_gripperOrientationTarget ( otarget)Rectangle22 ( r22)all except B.4 In particular, in order to get the position of the arm, you must use
youBot_refas reference. Using the world (-1) will return inconsistent results.If these functions return inconsistent results, try with another mode (such as
vrep.simx_opmode_oneshot_waitinstead of the defaultvrep.simx_opmode_buffer). - simxGetObjectParent
- simxGetObjectPosition
- simxGetObjects
- simxGetObjectSelection
- simxGetOutMessageInfo
- simxGetPingTime
- simxGetStringParameter
- simxGetStringSignal
- simxGetUIButtonProperty
- simxGetUIEventButton
- simxGetUIHandle
- simxGetUISlider
- simxGetVisionSensorDepthBuffer
- simxGetVisionSensorImage
- simxGetVisionSensorImage2
- simxJointGetForce
- simxLoadModel
- simxLoadScene
- simxLoadUI
- simxPackFloats
- simxPackInts
- simxPauseCommunication
- simxPauseSimulation
- simxQuery
- simxReadCollision
- simxReadDistance
- simxReadForceSensor
- simxReadProximitySensor
- simxReadVisionSensor
- simxReleaseBuffer
- simxRemoveObject
- simxRemoveUI
- simxRMLPosition
- simxRMLVelocity
- simxSetArrayParameter
- simxSetBooleanParameter
- simxSetFloatingParameter
- simxSetFloatSignal
Only with the following signal:
rgbd_sensor_scan_angle. - simxSetIntegerParameter
- simxSetIntegerSignal
Only on the following signals:
displaylasers,handle_xyz_sensor,handle_xy_sensor,handle_rgb_sensor,gripper_open,km_mode. - simxSetJointForce
- simxSetJointPosition
- simxSetJointTargetPosition
Only with the following joints:
youBotArmJoint*. - simxSetJointTargetVelocity
Only on the following joints:
rollingJoint_*. - simxSetModelProperty
- simxSetObjectFloatParameter
- simxSetObjectIntParameter
- simxSetObjectOrientation
Only with the following handle arguments, as in the simulator (the values between parentheses indicate the corresponding field of the structure returned by
youbot_init):objectHandle relativeToObjectHandle eulerAngles Milestone rgbdSensor ( rgbdCasing)youBot_ref ( armRef), youBot_center (ref)[0, 0, *] (any) youBot_gripperOrientationTarget ( otarget)Rectangle22 ( r22)(any) all except B.4 - simxSetObjectParent
- simxSetObjectPosition
Only with the following handle arguments, as in the simulator (the values between parentheses indicate the corresponding field of the structure returned by
youbot_init):objectHandle relativeToObjectHandle Milestone youBot_gripperPositionTarget ( ptarget)youBot_ref ( armRef)all except B.4 - simxSetObjectSelection
- simxSetSphericalJointMatrix
- simxSetStringSignal
- simxSetUIButtonLabel
- simxSetUIButtonProperty
- simxSetUISlider
- simxSetVisionSensorImage
- simxStart
- simxStartSimulation
- simxStopSimulation
- simxSynchronous
- simxSynchronousTrigger
- simxTransferFile
- simxUnpackFloats
- simxUnpackInts
MATLAB Tips
Avoiding Loops
MATLAB is an interpreted language. Despite recent progress in the JIT accelerator, running loops in MATLAB is still much slower than running loops in native code. Since most MATLAB functions rely on a C implementation of large loops, it is good practice to always prefer calling a function over writing a loop when handling large datatypes. In your project, the two datatypes that you need to handle with care are images and point clouds (from the RGB camera, or from the 2D/3D laser scanners). Handling images and point clouds with MATLAB functions or MEX functions instead of MATLAB loops will often make your code 100 times faster.
An example of the computational cost of flipping an image with a loop vs. a MATLAB function is provided here.
Running Code from Files
The MATLAB JIT accelerator doesn't optimize code typed into the console, even though recent versions of MATLAB have greatly improved in terms of performance. To verify this behavior, run the function above by typing test_loop_vs_native in the console, then by copy-pasting the contents of the test_loop_vs_native function directly into the console. As a result of this behavior, always run your code from .m files.
YouBot Tips
Unintentional Movements
V-REP does a pretty good job of simulating the real world. This can sometimes lead to unexpected problems. For instance, if no input is given to the wheels and the arm is swung back and front, the robot will move back and forth (slightly). In the third example below, you can verify that the final robot position is about a centimeter further than the initial position.
Physics Engine
We recommend using the ODE engine.Use the Toolboxes!
There are plenty of functions in Peter Corke's Robotics Toolbox that will help you with high-level algorithms (path planning, vision…), but also low-level computations (pose transformation, angle distance…). Don't forget to use them!
If you have them, MATLAB also has many interesting toolboxes for this project: for computer vision (MATLAB Image Processing Toolbox, MATLAB Computer Vision System), machine learning (Statistics and Machine Learning), and robotics (Robotics System), more specifically. Pay attention that not all of them are included in the student version of MATLAB.
Useful Functions/Tools
- The MATLAB
inpolygonfunction
Troubleshooting V-REP
Avoiding Mysteriously Dangerous Calls
For a mysterious reason, calling
res = vrep.simxReadVisionSensor(id, hokuyo1Handle, vrep.simx_opmode_buffer);
with only one return value crashes some versions of MATLAB. Always use the multi-return call instead:
[res det auxData auxPacketInfo] = vrep.simxReadVisionSensor(id, hokuyo1Handle, vrep.simx_opmode_buffer);
V-REP Crashing at Startup, or MATALB Cannot Connect to V-REP
When V-REP quits, the port that it was using to listen for connexions is not freed immediately. If your V-REP crashes when you try to start it up, or if you cannot connect to V-REP from MATLAB, quit V-REP, wait a few dozen seconds, and try again.